
Received a request for the Gimp version of my animated eyes tutorial.
(I am using the same image posted earlier.)
Tools: GIMP
An eyelash brush / or if you are good at drawing eyelashes you will not need one.
For an eyelash brush check : BRUSHEEZY OR DEVIANTART to find and download brushes.
Step 1. On the first layer is the image of your medoll - duplicate that image - we will refer to these new layers as M1 and M2


(Use this image to help you organize your layers )


Step 7. Click FILE >>> SAVE
When the little window pop-up, type in the name you want to save your file as. Then click on "Select File Type (By Extension)" and choose GIf Image then click Save.


Another window will pop up. Select everything i highlighted in the image below. Then click save.
209 milliseconds is OK if you have did Step 3
375 milliseconds or a little higher is OK if you did not include Step 3

That's it.
TO USE GIF FILES ON A BLOG YOU MUST FIRST UPLOAD THE FILE TO A FILE HOSTING WEBSITE SUCH AS TINYPIC.COM OR PHOTOBUCKET.COM OR ANY OTHER WEBSITE YOU KNOW ABOUT.

(I am using the same image posted earlier.)
Tools: GIMP
An eyelash brush / or if you are good at drawing eyelashes you will not need one.
For an eyelash brush check : BRUSHEEZY OR DEVIANTART to find and download brushes.
Step 1. On the first layer is the image of your medoll - duplicate that image - we will refer to these new layers as M1 and M2

Step 2. Create a new layer above M1- and on this new layer draw the eyelashes or use the eyelash brush to place the eyelashes above the eyes.
Then merge this new layer to M1.

(Step 3. Is if you want to create a very realistic blink, If not you can go ahead to Step 4)
Step 3. Draw the eyes closing in its various stages.
Remember to add the eyelashes - you may have to edit the eyelashes (this depends on the type of eyelashes you are using) before merging it to the image of your medoll.
Plus you must create more duplicates of layer M2 to help you edit the eyes and draw the eyes closing in the various stages.
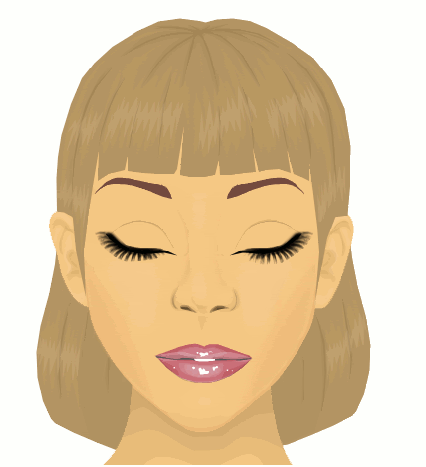
The image below shows how the eyes should be drawn in the various stages.(Use this image to help you organize your layers )

This is how you draw the eyes being closed.
Step 4. Create a new layer above M2 (the duplicated layer) then paint over the eyes.
For people who want their medoll to look like it is wearing make up - just pick whatever color you want to paint over the "eyelids".
And draw the crease of the eyes - just to make it look a little more realistic.

Step 5. Create another layer, and on this new layer draw the eyelashes or use the eyelash brush to place the eyelashes near the lower lid of the eyes.
Merge the layer with the eyelashes to the layer that has the medoll with its eyes close.

Step 6. Click on FILTERS >>> ANIMATION >>> PLAYBACK
When the Playback window appears, set the playback option to 50% then click "Play" button.
(This will show you a preview of what your animated image will look)
This is usually the time you check to see if everything is in order and looks OK to you.

Step 7. Click FILE >>> SAVE
When the little window pop-up, type in the name you want to save your file as. Then click on "Select File Type (By Extension)" and choose GIf Image then click Save.

Another window should pop up - select everything I highlighted in the following image. Then Click Export.
Another window will pop up. Select everything i highlighted in the image below. Then click save.
209 milliseconds is OK if you have did Step 3
375 milliseconds or a little higher is OK if you did not include Step 3
That's it.
TO USE GIF FILES ON A BLOG YOU MUST FIRST UPLOAD THE FILE TO A FILE HOSTING WEBSITE SUCH AS TINYPIC.COM OR PHOTOBUCKET.COM OR ANY OTHER WEBSITE YOU KNOW ABOUT.
Image 1 - smooth blink @ 209 milliseconds Image 2 -Two layer blink @ 375 milliseconds
1 comment:
This was really helpful thanks..
Post a Comment