Followers

Hrly's Tutorial

Wednesday, January 26, 2011

The "Aging Medoll"

Haven't posted anything in a little while - working on other stuff.

I though I would post this pics I have on my computer for a little while


However the next one is recent .

This one is the aging medoll >>>> People are always enhancing the medoll's appearance but I have never seen anyone try to show the medoll "growing old" (yeah the medoll is a bunch of pixels, but just use your imagination and work with me on this one) :)


Thursday, January 6, 2011

Here we go again.....another hair practice

Working on drawing hair. Tell me what you think.

Tuesday, January 4, 2011

Rose_Jean's banners


Saturday, January 1, 2011

BLINKING EYES / ANIMATED EYES TUTORIAL

You will need Photoshop since I am using this program to put together this tutorial.
(NOTE WELL PEOPLE ALSO USE GIMP - BUT THE INSTRUCTIONS WOULD BE DIFFERENT - CHECK YOUTUBE THERE ARE TONNES OF TUTORIAL THERE -  MAYBE I WILL MAKE ON ABOUT GIMP, IDK.)
 And an eyelash brush / or if you are good at drawing eyelashes you will not need one.
For an eyelash brush check : BRUSHEEZY OR DEVIANTART to find and download brushes.

Step 1. On the first layer is the image of your medoll - duplicate that image - we will refer to these new layers as M1 and M2 (just for this tutorial)


Step 2. Create a new layer  above M1- and on this new layer draw the eyelashes or use the eyelash brush to place the eyelashes above the eyes.
Then merge this new layer to M1.

Step 3. Create a new layer above M2 (the duplicated layer) then paint over the eyes.
For people who want their medoll to look like it is wearing make up - just pick whatever color you want to paint over the "eyelids".
Step 4. Create another layer, and on this new layer draw the eyelashes or use the eyelash brush to place the eyelashes near the lower lid of the eyes.
Step 5. Create another layer and draw the crease of the eyes - just to make it look a little more realistic.
Then merge those Layers previously created in step 3,4 and 5 to M2.

In the end you should be left with ONLY TWO LAYERS.


Now it is time to save your file. To make Animated files you have to save it as a gif file.

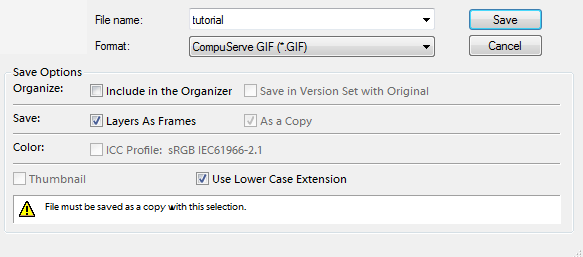
Click Save, make your own file name and choose the format shown in the image below. Check mark save "Layers as Frames" then click the save button.

 In the new window that pop up do the following : Make sure you check mark all the boxes shown in the image. In the "Frame Delay" section choose 0.5, this is an OK setting for the eyes -  it will not make the eyes blink too fast or too slow. After all of this is done click "OK" .
 
 
THE STEPS YOU JUST DID SHOULD SAVE YOUR GIF FILE. WHEN YOU GO BACK TO THE PHOTOSHOP WINDOW SAVE YOUR FILE - LIKE HOW YOU WOULD SAVE ANY OTHER FILE YOU MAKE WITH THE PROGRAM.

 
TO USE GIF FILES ON BLOGS YOU MUST FIRST UPLOAD THE FILE TO A FILE HOSTING WEBSITE SUCH AS TINYPIC.COM OR PHOTOBUCKET.COM OR ANY OTHER WEBSITE YOU KNOW ABOUT.
 
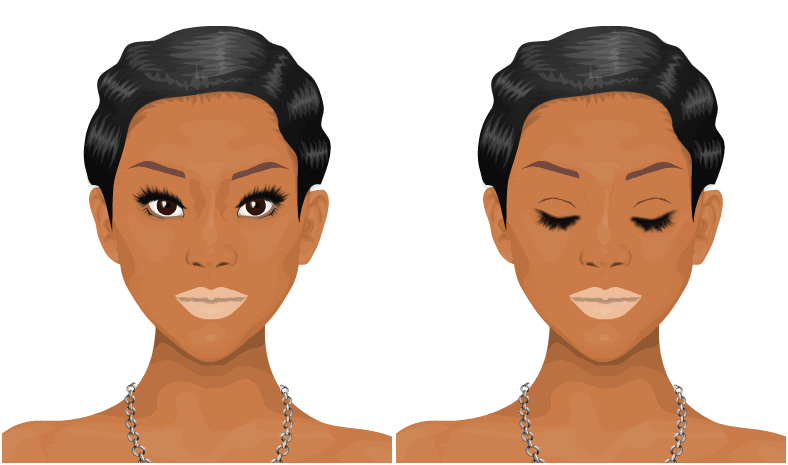
THE FINISHED PRODUCT SHOULD LOOK ALMOST LIKE THIS


Thursday, December 30, 2010

Edited Realistic Face

I add a little hair and a neck, so here it is...............(still need to work on drawing hair)


Tuesday, December 28, 2010

REALISTIC FACE = 0)

AFTER VIEWING TONNES OF TUTORIALS ONLINE THIS IS THE FINAL PRODUCT

IT TOOK about TWO (2) HOURS TO MAKE (was watching TV while making it).

The eyes have no eyelashes - I added some then removed it, they didn't look right - need to work on that.
It's just the face no hair, neck or anything.


Enhanced the image and here is what happened (THE COLOR OF THE EYES GOT MESSED UP IN THE PROCESS):

Another face...

Just another little drawing - going to keep working on it until I learn to draw a realistic face.

Saturday, December 25, 2010

Hrly Images new banner.


I like dogs - man's best friend - so I add a cute little dog to the banner with me.


 Just a little part of the blog's new banner, thought it was time for a change.
It is not holiday themes or anything, just wanted a new look for the new year.

Merry Christmas , and have a Happy New Year.

Friday, December 24, 2010

Stardoll Highs banner

Thursday, December 9, 2010

Bad Friend Request


This is totally off topic.
Well today I received my first hacker threat - imagine my surprise. I was advised to say "bye bye" to my account. Plus he or she even wrote my name under his/her hacker list.

(Just made this post so I will remember)


Saturday, December 4, 2010

Stardoll Highs banner

for MissLiLLyLo

http://i1020.photobucket.com/albums/af321/mehrly/stardollhighblogbanner2.png

Friday, December 3, 2010

SMW contest entry


Most of it is hand drawn - the exceptions: John's face and hair + all the other faces.

I can't believe Jenna's hair turn out that good    (*bias* opinion = me )

Sunday, November 28, 2010

More Graphics

So I have not posted anything for a while, however I have been practicing both graphics and being patience about the process of creating my graphics - Since I'm always a little too eager about getting it done once I start making something.

It might be paying off - the whole "having patience thing".

Wednesday, November 3, 2010

Banners